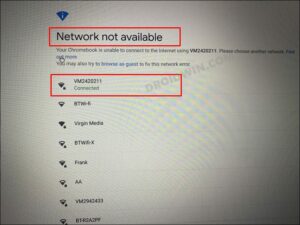
Issue Description: Upon turning on a brand new Acer Chromebook and completing the initial setup, the user successfully connected to Wi-Fi and accepted the Chrome OS Terms. However, they encountered an error message stating “Network not available.” Despite being connected to either Wi-Fi or Ethernet, they were unable to proceed past this screen or return to the previous step.
Troubleshooting Steps Taken:
- Connected to a phone hotspot to verify if the issue persisted.
- Performed a power wash and hard reset to attempt to resolve the problem.
- Confirmed that the internet is accessible in Guest mode using Chrome, indicating that the issue is specific to the user’s account.
- Attempted to resolve the issue by restarting both the Wi-Fi and the router.
- Noted that the preloaded Chrome OS version is 86.0.
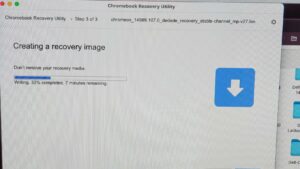
- Successfully fixed the issue using the Chromebook Recovery Utility.
- Tried creating a USB Chromebook Recovery Utility on an iMac, as it didn’t work on Windows 10 or 11 due to Linux-related limitations.
Revised Version:
Encountered Error: “Network not available” during the initial setup of a brand new Acer Chromebook, even after successfully connecting to Wi-Fi and accepting the Chrome OS Terms.
Troubleshooting Steps Performed:
- Verified network connectivity by connecting to a phone hotspot.
- Attempted to resolve the issue by performing a power wash and hard reset.
- Internet access confirmed in Guest mode, implying a user account-specific problem.
- Tried resolving the issue by restarting both the Wi-Fi and router.
- Noted the preloaded Chrome OS version as 86.0. ( from version 80 to 95. all have the same issue)
- Successfully resolved the error using the Chromebook Recovery Utility.
- Created a USB Chromebook Recovery Utility on an iMac, as it didn’t work on Windows 10 or 11 due to Linux-related limitations.
Note:
If you encounter the “chromebook-recovery-utility-unable-to-write-on-usb-drive” error when trying to create a recovery USB drive on your Chromebook, you can try using a Linux or macOS computer to create the recovery USB. Here’s a step-by-step guide on how to do it:
Requirements:
- A Linux or macOS computer with a USB port.
- A compatible USB flash drive or SD card (at least 8GB in size) that you want to use as the recovery media.
Steps to create Chromebook recovery USB on Linux or macOS:
- Download the Recovery Image:
- Visit the official Chromebook Recovery Utility website (https://chrome.google.com/webstore/detail/chromebook-recovery-utili/jndclpdbaamdhonoechobihbbiimdgai) and download the Chromebook Recovery Utility extension. However, since you mentioned encountering an error on your Chromebook, it’s possible you may not be able to use the official utility on your Chromebook itself, which is why we are using another computer.
- Install the Recovery Utility on Linux or macOS:
- On Linux: Follow the instructions provided on the Chromebook Recovery Utility website for Linux installation.
- On macOS: Install the Recovery Utility from the Chrome Web Store using the link provided above.
- Identify the Chromebook Model:
- You will need to know the exact model of your Chromebook, as the recovery image is specific to each model. You can usually find this information on the back or bottom of your Chromebook.
- Open the Recovery Utility:
- Launch the Chromebook Recovery Utility on your Linux or macOS computer.
- Agree to the Terms:
- Accept the terms and conditions presented by the Recovery Utility.
- Enter the Chromebook Model:
- Enter the model name of your Chromebook in the provided field.
- Create Recovery Media:
- Insert the USB flash drive or SD card into the USB port of your Linux or macOS computer.
- Select the USB Drive or SD Card:
- In the Recovery Utility, choose the USB flash drive or SD card from the list of available drives. Be very cautious to select the correct drive, as the process will erase all data on the selected drive.
- Create Recovery Media:
- Click on the “Create now” button in the Recovery Utility to begin the recovery media creation process.
- Wait for Completion:
- The Recovery Utility will download the appropriate recovery image for your Chromebook and write it to the USB flash drive or SD card. This process may take some time depending on your internet connection speed and the speed of your USB drive.
- Eject the USB Drive or SD Card:
- Once the process is complete, safely eject the USB flash drive or SD card from your Linux or macOS computer.
Using the Recovery USB on your Chromebook:
After successfully creating the recovery USB using Linux or macOS, you can now use it to recover your Chromebook.
- Turn off your Chromebook completely.
- Insert the recovery USB into one of the USB ports on your Chromebook.
- Turn on your Chromebook.
- When prompted, follow the on-screen instructions to initiate the recovery process.
Please note that using the recovery USB will erase all data on your Chromebook, and it will be restored to its factory settings. Make sure to back up any important data before starting the recovery process.
Remember, the steps may vary slightly depending on the version of the Chromebook Recovery Utility or changes made by Google to the process. Always refer to official documentation or Google support for the most up-to-date information.